Nov. 16, 2015 by Karen Warren
There was a major service interruption from approx 8:45 to 9:30 am this morning, 11/16. ITS has narrowed down the equipment that caused the failure and is working with the vendor to determine why the system redundancy was also affected. Services are now back online.
Posted in syndicated-posts, Urgent
Nov. 11, 2015 by Karen Warren
You must reset your password by today at 2:00 PM. If you have not done so, please take a minute to change your password or you will be locked out of your account at 2:00PM.
What makes for a good password?
Passwords are integral to information security. While we all know this, it is easy to take the easy way and not make a secure password. ITS recommends checking out this guide to setting passwords. http://er.educause.edu/blogs/2015/10/8-dos-and-donts-of-good-passwords
Phrases of 14 characters or more are always preferable to shorter passwords.
What to do if you miss the deadline? You have two choices.
One:
Use the new Self-Serve Password Reset application.
On the Login Screen, click Forgot Password?
Note: this requires you have either your WesID card or an alternate email address on file in your EPortfolio. See http://itsinfo.blogs.wesleyan.edu/2013/10/23/self-serve-password-reset/ for more information on using this application.
Two:
Contact the appropriate ITS staff to unlock your account:
Students – ITS Helpdesk at (860)685-4000 or x4000
Faculty and Staff in academic departments – your Desktop Support Specialist or ITS Operations (860)685-4100 x4100
Staff in administrative departments – Administrative Helpline (860)685-4777 (x4777) or ITS Operations (860)685-4100 (x4100)
Posted in syndicated-posts, Urgent
With the launch of the new Master Calendar, the process of adding events to a department web site has changed.
If you have set events to appear on your website and you do not see them,
- Please first log into Cascade to see if they appear on your page within Cascade
- If they are in Cascade
- publish your page and they will now be live to your site
- If they are not appearing in Cascade
- make sure you have added the event to your department website by following the directions below
Adding events to a department website
- After your event is approved in Master Calendar, go to your portfolio
- Go to Select Department Websites from the Events & Scheduling bucket.
- Find your event in the list
- Press Add Website to the left of the event
- Select the webpage/department on which you want the event to appear
- Use the arrows in the center to move your selection to the box on the right
- You can have it appear on multiple pages if the events has multiple sponsors.
- Please make sure to request permission from the owner of the other site before posting.
- Save your changes
- Once you have selected and saved the websites, there will be a 5 minute delay before the event is available to appear on your website.
Your event page in Cascade will auto-publish each night with the updated information. If you would like your event to appear on your web page before the auto-publish runs, you may log into Cascade and manually publish your page or your whole site.
Still Not Appearing
If you have completed the steps above
- looked at the page in Cascade and don’t see your events
- use the portfolio application to add the event to your website
and your events are still not showing on your website please email wes_events@wesleyan.edu Please give the date, time and title of the event and the url of the page the events should be appearing on.
If you do not currently have a feed of your departmental events to your website, you will need to request having this set up.
- Please go to Service Now and add in a request ticket for this. Web and Video Service (formerly the New Media Lab) will work on adding events to your website and getting your website added to the Select Department Websites page.
Once everything has been set up, you can select your Department Website for the event you wish to appear on your new page.
Posted in syndicated-posts
Nov. 7, 2015 by Karen Warren
On Saturday afternoon, there was a disruption to Internet connectivity that affected all outbound and inbound traffic to the Internet. While there are redundant systems in place, ITS is investigating why these systems did not behave as expected. ITS staff were on site and had connectivity restored by 3:30 PM.
Posted in syndicated-posts, Urgent
Nov. 6, 2015 by jcarlstrom
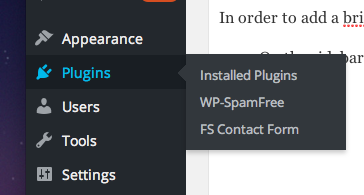
In order to add a brightcove video to your post please follow these steps:
- On the sidebar to the right of your wordpress site, select “plugins.”
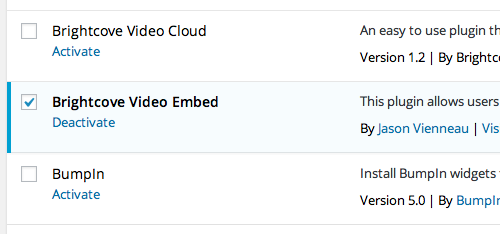
- Next, scroll down, find “Brightcove Video Embed,” created by Jason Vienneau, and check the box next to it.
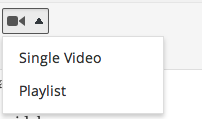
Now, when you create a new post and want to insert a video, select the camera icon on the top of the toolbox.

- Select Single Video or Playlist.
- Enter your 13-digit Brightcove ID.
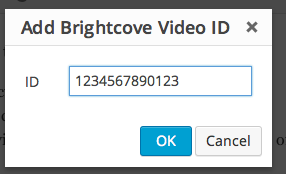
- A short code will come up in the textbox. Once you have published the post a video will be in its place.

- Your post should now include a video!
Posted in Cascade websites, syndicated-posts, Video
Nov. 4, 2015 by Karen Warren
UPDATE: Power has been restored throughout the complex and all systems are back online.
Physical plant is working on addressing a power outage that has affected all of the Science Complex and Olin Library. The data center is online and powered by generator. We are monitoring systems closely during this event. Critical systems are all online.
Faculty and staff in these buildings will gradually have network access restored as power is returned in phases and network equipment comes back online.
Posted in syndicated-posts, Urgent
Oct. 23, 2015 by jcarlstrom
Some pages have a map that has predefined markers on it for visitor reference. Such a page is displayed below (without any map markers)
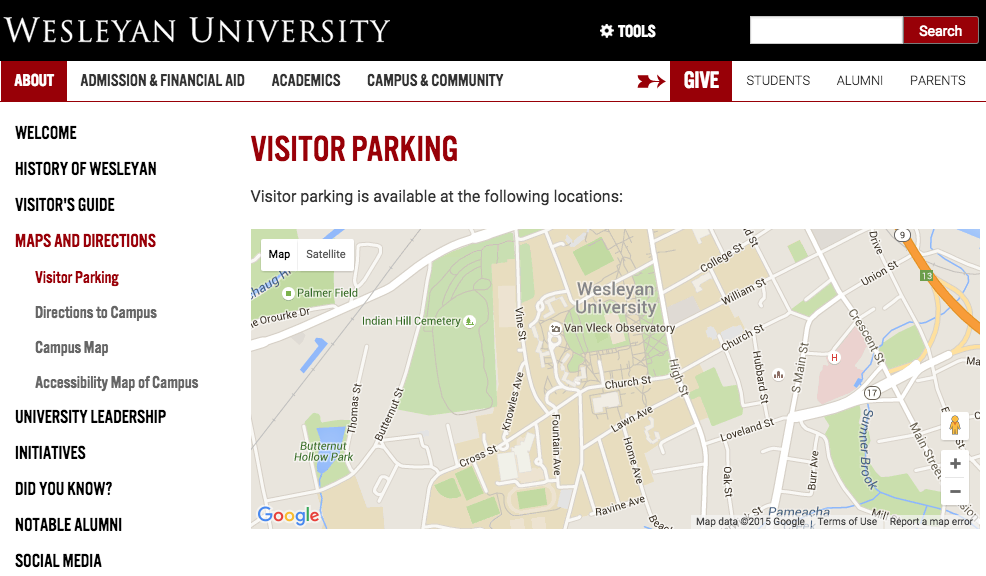
1. There should be a folder in the left sidebar which says “map-data”. In this folder, you should find a page called “map-markers’. Go to this page and click the “Edit” tab.
2. As you can see in the image below, there are editable sections where you may input the required data.
To add a map marker, you should know the longitude and latitude of the marker. The address field does not need the full address but rather a ‘nickname’ for the marker which allows the visitor to identify the location. You will also need a link to Google Maps for the actual location.
Remember, you can always add another marker by clicking the green ‘+’ icon.
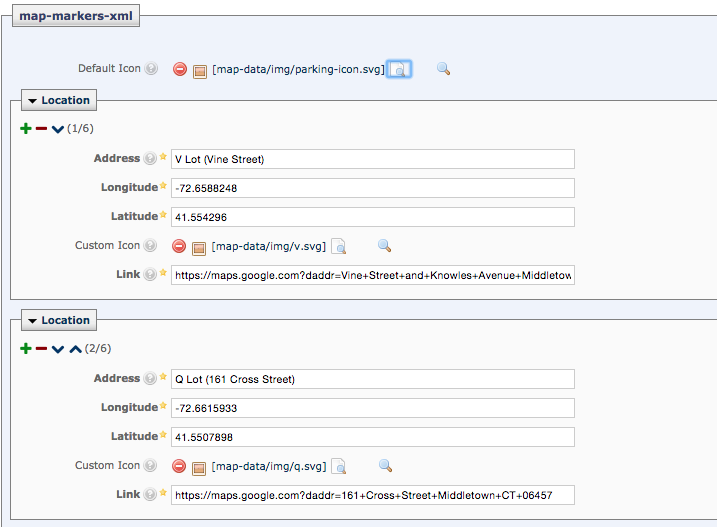
3. You may notice the field “Custom Icon”. If there is not already an icon, you may use the default image. This is found in the ‘map-data’ folder within the ‘img’ subfolder. Use the image named “parking-icon.svg” unless told otherwise.
4. Once you’re done adding and editing the markers, click “Submit”.
Posted in Cascade websites, syndicated-posts
Oct. 23, 2015 by jcarlstrom
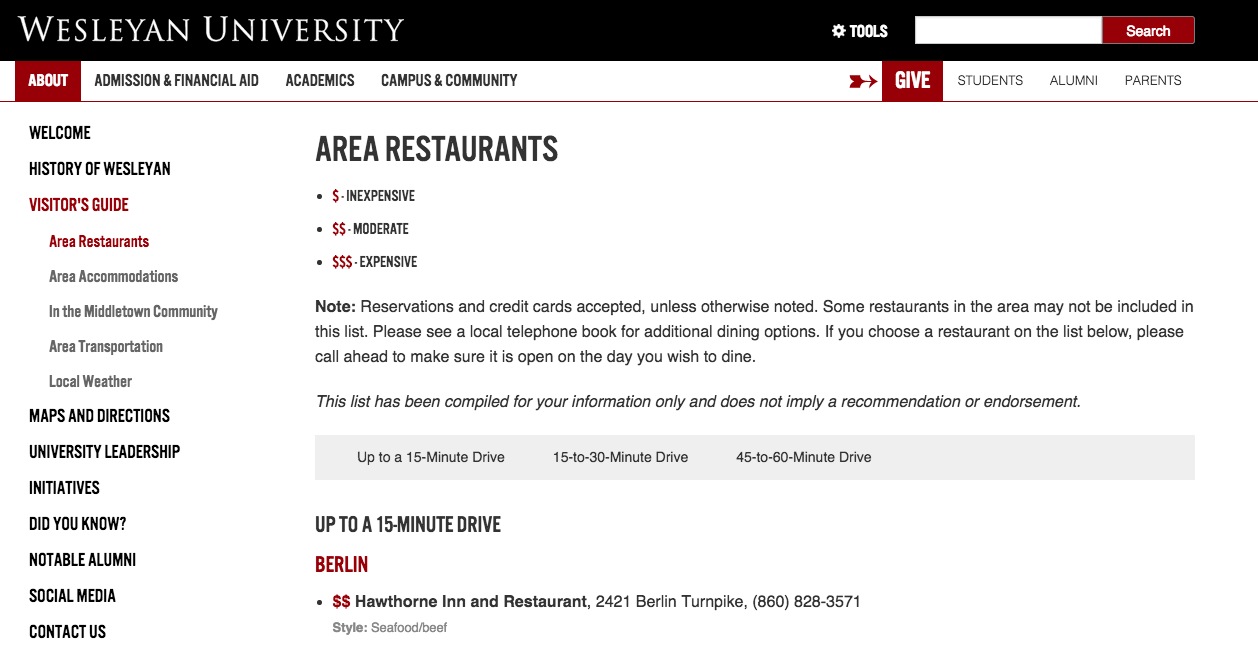
The “Restaurants” page is similar to the “Lodgings” page, but with extra formatting needs as will be shown in the tutorial below.
1. Click the “edit” tab at the top of the “Restaurants” page. This is where you can make edits to the content.
2. Under the main content area, there will be sections as shown in the image below.
Adding a section allows you to add another option to the navigation bar.
Each section will list the restaurants by area and the formatting guide is shown in the image below.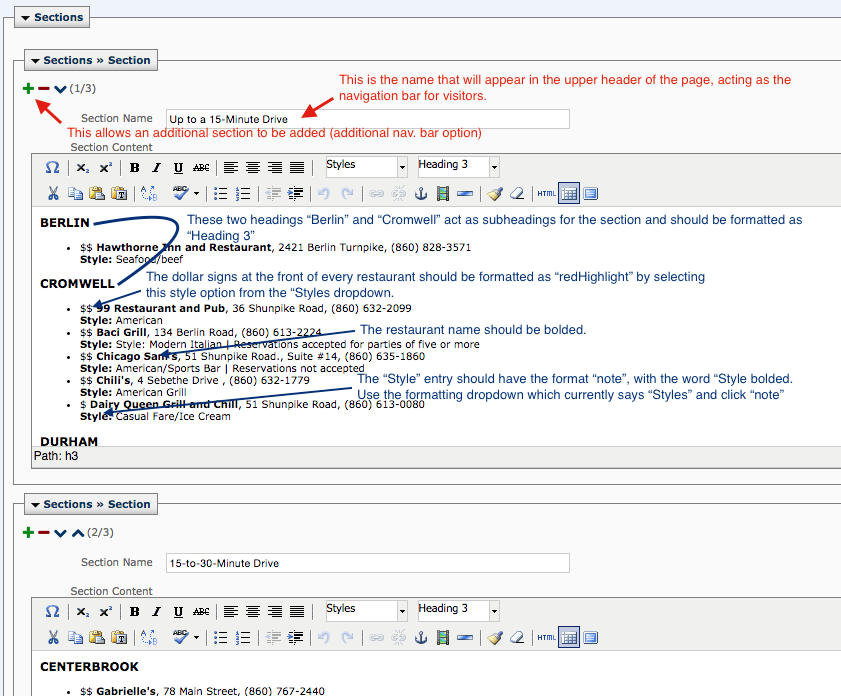
3. Once you’ve finished editing the page, get rid of any unused sections you may have added and click “Submit”.
Posted in Cascade websites, syndicated-posts
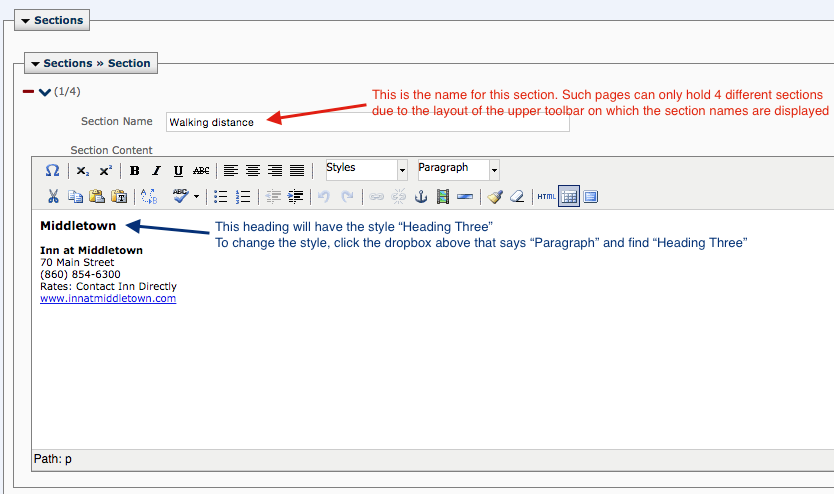
Oct. 23, 2015 by jcarlstrom
The “Lodging” page gives visitors information about surrounding accommodation options listed by distance from campus. This tutorial teaches you how to edit the information on such pages.
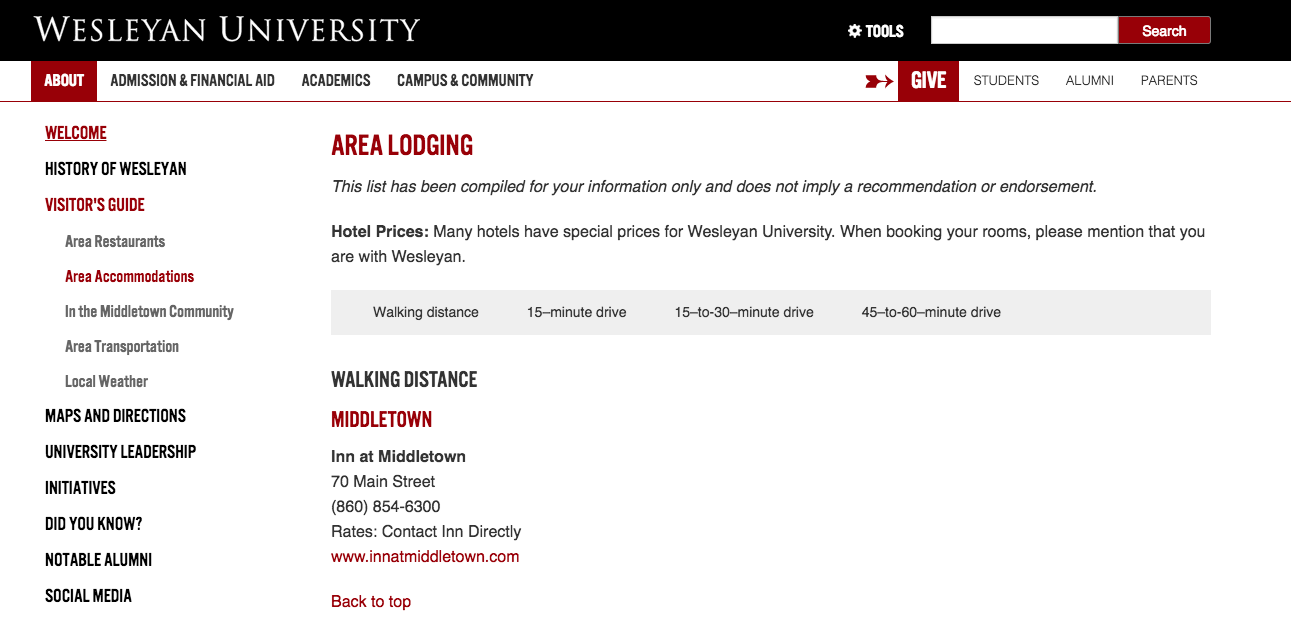
1. On Cascade, go to the relevant page and click “Edit” in the top tab. This will bring you to the page where you can start making content changes.
2. Edit each section as necessary, keeping in mind that each section’s subheading should be formatted as “Heading Three” (as shown below)
3. Once you’ve made the necessary changes for each section, click submit!
Posted in Cascade websites, syndicated-posts
Oct. 23, 2015 by jcarlstrom
Some sites will have a dedicated social media page which allows visitors to connect with you via social media. 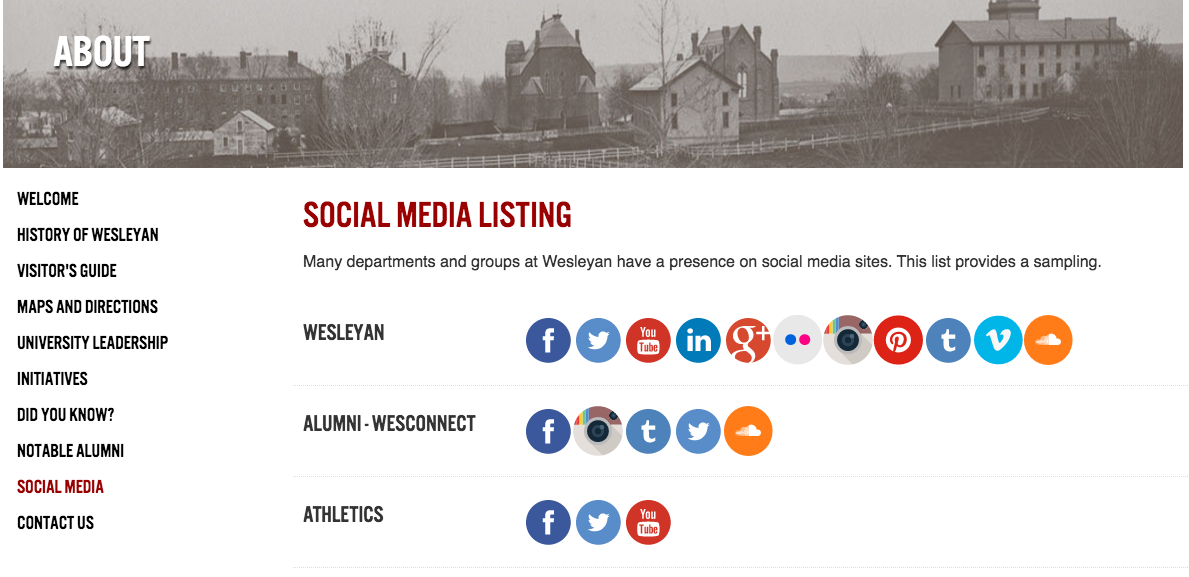
This tutorial will teach you how to edit such pages.
1. Click on the edit tab for the necessary page.
In this example, the social media page is highlighted in the left column (“social_media”) and the “Edit” tab has been selected (Top toolbar). This allows you to make changes to the page.
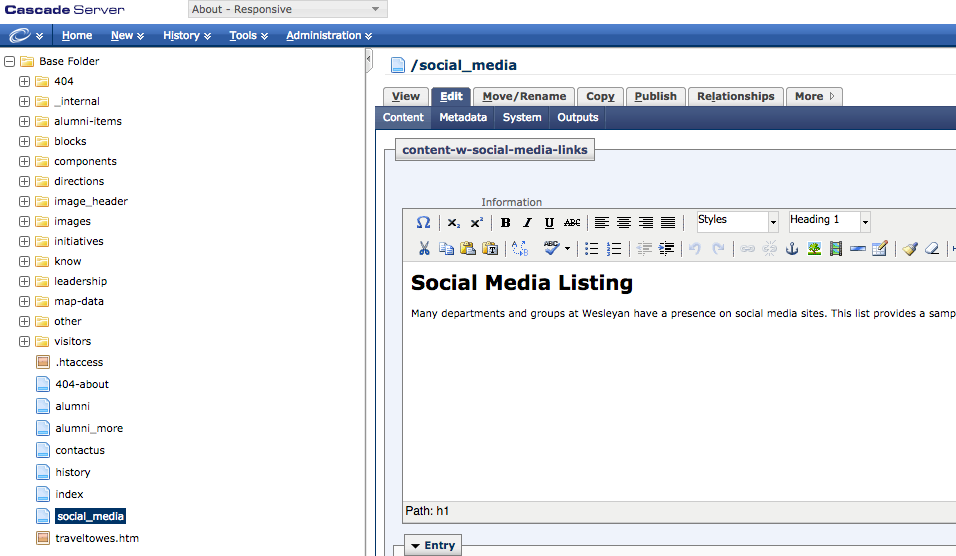
2. Under the main content area (where the bolded word “Social Media Listing” is found in the previous picture), there are entry boxes that look like this – without annotations, of course.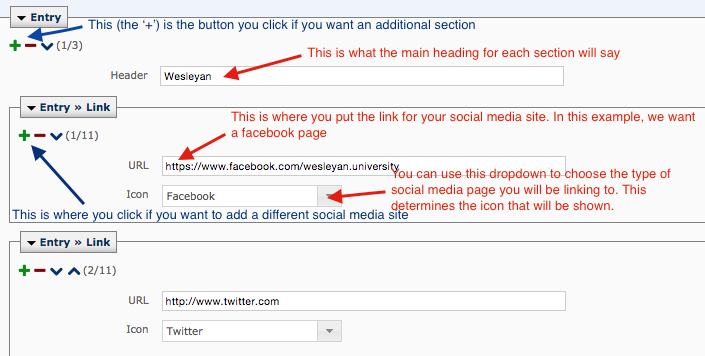
You can add additional sections and additional links depending on your needs. Make sure you choose the right icon and insert the relevant link.
3. Once you’re done adding the necessary icons and sections, you’re done! Click submit.
Posted in Cascade websites, syndicated-posts


