How to add an “Alert” to the library home page

What to use Alerts for
The “Alert” section of the library home page is used to alert our users of information we need to get out to them immediately. In most cases, the information in an alert would only need to stay on the home page for 48 hours or less.
Examples of things that might go into the Alert section:
- library emergency closing or unanticipated change in hours
- our open/closed status during severe weather or campus-wide closings
- catalog or OneSearch outage
- a major database (such as JSTOR) is down
- a brand-new, much asked for service has been added
This section of the home page appears only when there is content in it. When there is no content, the Alert box disappears.
Who can post: To edit the Alert box, you must have a login to Cascade. If you think you may need to add an Alert but do not have a Cascade login, let Lori know.
How to add an alert
- Log in to Cascade, http://cascade.wesleyan.edu. Use your Wesleyan username and password to login.
- In the left hand navigation bar, single-click on the index page under the Base Folder.
- You will see the library home page
- Cick the Edit tab at the top of the home page.

- The first box shown on the edit page is the Alert box.
- In the Start Date, choose the date that you want the Alert to be published on the web site (ignore the time option, it doesn’t do anything).
- In the End Date, choose the date that you want the Alert to be removed from the web site (ignore the time option, it doesn’t do anything).
You must provide both a Start Date AND an End Date. Your item will not display on the public web page if you do not provide both dates.
- In the Heading, enter the text that you want to appear in the yellow title bar of the Alert box.
- In the main edit area, enter the text that you want to appear in the white part of the Alert box. You can add html links and formatting in this text if desired.
- When done, scroll to the bottom of the page and click Submit.
- If you get any errors about the Summon URL being a broken link, just click the Submit button again (it’s a false error).
- Click the Publish tab to push your changes to the public web site.
Posted in Department Guides, syndicated-posts, Training
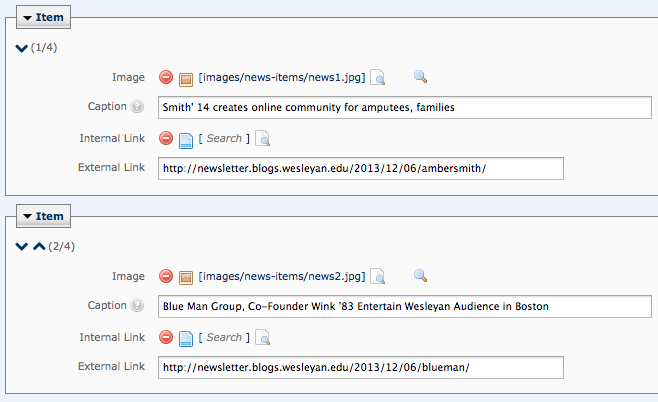
The News Items are the 4 news stories that in desktop view sit to the right of the large image for the News Feature. You have the ability to add descriptive text that is linked to a larger story. In the tablet view the News Items sit under the featured story and in the mobile view they become a swipe component.
You will also want to check the amount of descriptive text to be sure it fits in the appropriate box for each view.
For every featured story you will need:
- an image for each news item
- descriptive text
- link to larger story
Uploading the Images into Cascade
- create the image
- upload the image(s) to cascade
- use the dropdown to navigate to Home – Responsive
- high light the images > news-items folder
- for each image
- go to New > Upload File or Image
- Browse to find the image on your computer
- Submit to upload the image
- be sure to rename each image using a good naming convention
- select each image
- go to Move/Rename
- enter the new name in the System Name field
- consider using the date in the name
- for example: 20141204-longlane.jpg
Once the images are uploaded you will need to add your new item to the component.
Preview your changes in Cascade
You should preview how the transparent box sits on the image and check that the caption and hashtag fit in the transparent box on all sizes of the responsive page.
- you can do a preliminary check of changes within cascade
- in Cascade go to Home > Responsive
- click on index to see the page in View mode
- resize the cascade window to simulate the desktop, tablet and mobile views
- to allow others to see the image you can publish the homepage and the images to the Staging Server
- go to Home > Responsive
- publish the images
-
- go to images > news-items
- select each image (if you have multiples do them separately)
- go to Publish
- be sure to uncheck the Production destination
- you only want to publish to the Staging destination
- publish the index
- go to Base Folder
- select the index
- go to Publish
- be sure to uncheck the Production destination
- you only want to publish to the Staging destination
- after the images and index have been published to the Staging Server you can view your changes at
http://cascadewww-staging.wesleyan.edu
- you can check this url on a desktop by re-sizing the window to simulate other device sizes
-or-
you can use this url on a tablet and/or mobile device
- if the text and/or image don’t work well at different sizes you may need to upload a new image or change the text
- when satisfied you can Publish the index to both destinations (Production and Staging)
Posted in Department Guides, syndicated-posts, Training
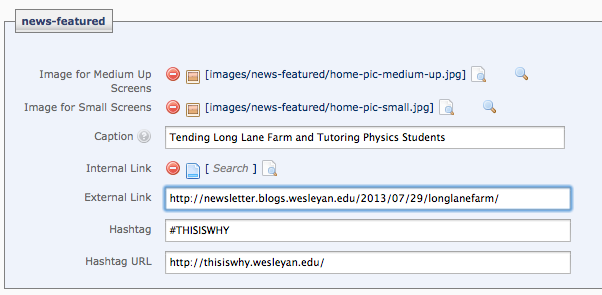
The News Feature is the large image on the homepage. You have the ability to add descriptive text that is linked to a larger story and a #hashtag with a link. The image changes size from desktop to tablet to mobile view so you will need to upload 2 separate images, one for desktop and tablet and one for mobile. You will notice that the #hashtag is only viewable in the desktop and mobile version, there is not room for it on the tablet view.
Because a transparent box is overlaid on top of the image you may need to re-crop your images to be sure the overlay does not interfere with the image. You will also want to check the amount of descriptive text to be sure it fits in the transparent box.
For every featured story you will need:
- 2 appropriately sized images
- descriptive text
- link to larger story
- optional hashtag
- optional hashtag link
Uploading the Images into Cascade
- create 2 sizes of the image
- upload the images to cascade
- use the dropdown to navigate to Home – Responsive
- high light the images > news-featured folder
- for each image
- go to New > File or Image
- Browse to find the image on your computer
- Submit to upload the image
- be sure to rename each image using a good naming convention
- select each image
- go to Move/Rename
- enter the new name in the System Name field
- consider using the date in the name
- for example: 20141204-longlane.jpg
Once the images are uploaded you will need to add your new item to the component.
Preview your changes
You should preview how the transparent box sits on the image and check that the caption and hashtag fit in the transparent box on all sizes of the responsive page.
- you can do a preliminary check of changes within cascade
- in Cascade go to Home > Responsive
- click on index to see the page in View mode
- resize the cascade window to simulate the desktop, tablet and mobile views
- to allow others to see the image you can publish the homepage and the images to the Staging Server
- go to Home > Responsive
- publish the images
-
- go to images > news-featured
- select each image (if you have multiples do them separately)
- go to Publish
- be sure to uncheck the Production destination
- you only want to publish to the Staging destination
- publish the index
- go to Base Folder
- select the index
- go to Publish
- be sure to uncheck the Production destination
- you only want to publish to the Staging destination
- after the images and index have been published to the Staging Server you can view your changes at
http://cascadewww-staging.wesleyan.edu
- you can check this url on a desktop by re-sizing the window to simulate other device sizes
-or-
you can use this url on a tablet and/or mobile device
- if the text and/or image don’t work well at different sizes you may need to upload a new image or change the text
- when satisfied you can Publish the index to both destinations (Production and Staging)
Posted in Department Guides, syndicated-posts, Training
The Events Section of the Homepage has 2 editable pieces.
The Event Listing Section contains information about actual events on campus. Each listed event contains a link either back to the calendar or to an appropriate story about the event. For an event to appear on the homepage UCOMM needs to go into the University calendar and select the homepage category. If there are no events marked for display on the homepage for a given day the events stored in the Events Component will be displayed
The Events Links Section contains links to the University Calendar, the Academic Calendar and two buttons, one for athletics and one for Center for the Arts.
Event Listing Section
Entering Non-Calendar Events
Remember, these events will only display if no events are marked for display in the University Calendar.
- use the dropdown to navigate to Home – Responsive
- go to components > events
- press Edit
- you will see the data definition allowing for data input
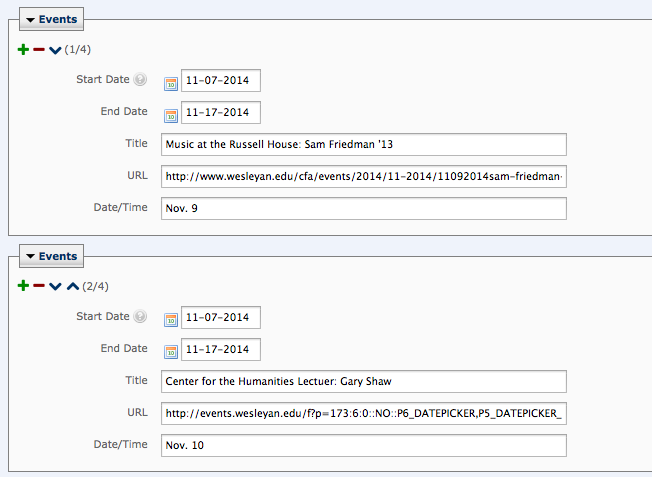
- Start Date
- use the orange calendar icon
 to select the date for this item to appear on the homepage
- End Date
- use the orange calendar icon to select the date for this item to stop appearing on the homepage
- Title
- the title of the event (be short but descriptive)
- URL
- URL to event information
- must include http://
- Date/Time
- Calendar Information about the event
- Events will show in order they are entered but they can be re-ordered
- Tools for adding, deleting, reordering

 : to add another entry
 : to remove an entry
 : to reorder
- Submit your changes.
Previewing your changes
It is not easy to preview the events section. The events will change daily and use the calendar and the non-calendar events entered into the component. You can only look at “today’s” events, you can not preview the events for future days.
Event Links Section
The link to the University Calendar and the link to the Academic Calendar are static, they can not be edited/changed. The two buttons are editable — the image, the wording overlaid on the image and the link can be changed.
To change a button you will need:
- appropriately sized image
- wording for image
- link
Uploading the Images into Cascade
- create an appropriately sized image
- upload the images to cascade
- use the dropdown to navigate to Home – Responsive
- high light the images > events-links folder
- for each image
- go to New > File or Image
- Browse to find the image on your computer
- Submit to upload the image
- be sure to rename each image using a good naming convention
- select each image
- go to Move/Rename
- enter the new name in the System Name field
- consider using the date in the name
- for example: 20141204-longlane.jpg
Once the images are uploaded you will need to add your new item to the component.
- use the dropdown to navigate to Home – Responsive
- go to components > event-links
- press Edit
- you will see the data definition allowing for data input

- use the paper with the magnifying glass icon
 to select the Image
- enter the Caption
- this is the text that sits in the transparent box under the image
- enter the Link
- this is where the image and text will link to
- use the paper with the magnifying glass icon to select an internal link
– or –
- type in an External Link
- be sure to include http://
- Events will show in order they are entered but they can be re-ordered
- : to reorder
- Submit your changes.
Preview your changes
You should preview how the transparent box with the text sits on the image on all sizes of the responsive page.
- you can do a preliminary check of changes within cascade
- in Cascade go to Home > Responsive
- click on index to see the page in View mode
- resize the cascade window to simulate the desktop, tablet and mobile views
- to allow others to see the image you can publish the homepage and the images to the Staging Server
- go to Home > Responsive
- publish the images
-
- go to images > event-links
- select each image (if you have multiple images do them separately)
- go to Publish
- be sure to uncheck the Production destination
- you only want to publish to the Staging destination
- publish the index
- go to Base Folder
- select the index
- go to Publish
- be sure to uncheck the Production destination
- you only want to publish to the Staging destination
- after the images and index have been published to the Staging Server you can view your changes at
http://cascadewww-staging.wesleyan.edu
- you can check this url on a desktop by re-sizing the window to simulate other device sizes
-or-
you can use this url on a tablet and/or mobile device
- if the text and/or image don’t work well at different sizes you may need to upload a new image or change the text
- when satisfied you can Publish the index and the images to both destinations (Production and Staging)
Posted in Department Guides, syndicated-posts, Training
Near the bottom of the homepage just above the college row image there is a place for one link to a special university initiative. Currently it is #THISISWHY.
To change the initiative you will need:
- the initiative title
- link to the initiative
Changing the initiative in the component.
- use the dropdown to navigate to Home – Responsive
- go to components > thisiswhy
- press Edit
- you will see the data definition allowing for data input
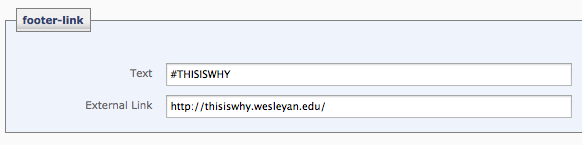
- enter the Text
- this is the name of the intiative
- enter the External Link
- be sure to include http://
Preview your changes
You should preview how the transparent box sits on the image and check that the caption and hashtag fit in the transparent box on all sizes of the responsive page.
- you can do a preliminary check of changes within cascade
- in Cascade go to Home > Responsive
- click on index to see the page in View mode
- resize the cascade window to simulate the desktop, tablet and mobile views
- to allow others to see the image you can publish the homepage and the images to the Staging Server
- go to Home > Responsive
- publish the index
- go to Base Folder
- select the index
- go to Publish
- be sure to uncheck the Production destination
- you only want to publish to the Staging destination
- after the index has been published to the Staging Server you can view your changes at
http://cascadewww-staging.wesleyan.edu
- you can check this url on a desktop by re-sizing the window to simulate other device sizes
-or-
you can use this url on a tablet and/or mobile device
- if the text and/or image don’t work well at different sizes you may need to upload a new image or change the text
- when satisfied you can Publish the index to both destinations (Production and Staging)
Posted in Department Guides, syndicated-posts, Training
The Explore Wes section contains 4 buttons linking to primarily admission content. Each button is an image with text overlaid and a link.
For each button you will need:
- an appropriately sized image
- descriptive text to be overlaid on the image
- a link to more content
Uploading the images into Cascade
- size of the images
- upload the images to cascade
- use the dropdown to navigate to Home – Responsive
- high light the images > explore folder
- for each image
- go to New > File or Image
- Browse to find the image on your computer
- Submit to upload the image
- be sure to rename each image using a good naming convention
- select each image
- go to Move/Rename
- enter the new name in the System Name field
- consider using the date in the name
- for example: 20141204-longlane.jpg
Once the images are uploaded you will need to add your new item to the component.
- use the dropdown to navigate to Home – Responsive
- go to components > explore
- press Edit
- you will see the data definition allowing for data input
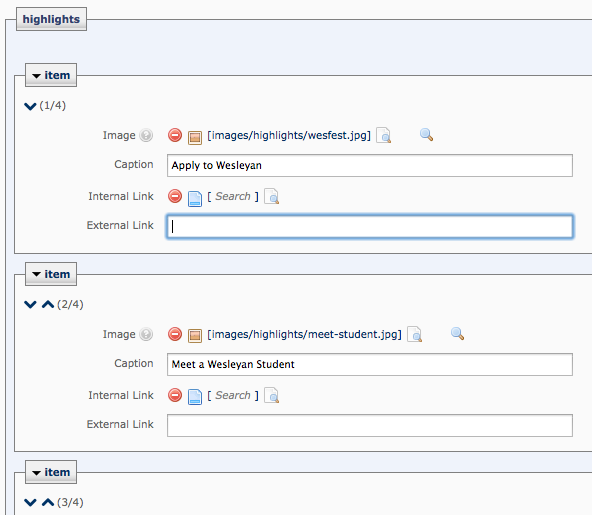
- use the paper with the magnifying glass icon to select the Image
- enter the Caption
- this is the text that sits in the transparent box at the bottom the image
- you may have to adjust the text to fit the space
- enter the Link
- this is where the image and text will link to
- use the paper with the magnifying glass icon to select an Internal Link
– or –
- type in an External Link
- be sure to include http://
- Events will show in order they are entered but they can be re-ordered
- : to reorder
Preview your changes
Preview your image and text on all sizes of the responsive page. Be sure the text fits in the transparent box on all sizes of the responsive page.
- you can do a preliminary check of changes within cascade
- in Cascade go to Home > Responsive
- click on index to see the page in View mode
- resize the cascade window to simulate the desktop, tablet and mobile views
- to allow others to see the image you can publish the homepage and the images to the Staging Server
- go to Home > Responsive
- publish the images
-
- go to images > explore
- select each image (if you have multiples do them separately)
- go to Publish
- be sure to uncheck the Production destination
- you only want to publish to the Staging destination
- publish the index
- go to Base Folder
- select the index
- go to Publish
- be sure to uncheck the Production destination
- you only want to publish to the Staging destination
- after the index has been published to the Staging Server you can view your changes at
http://cascadewww-staging.wesleyan.edu
- you can check this url on a desktop by re-sizing the window to simulate other device sizes
-or-
you can use this url on a tablet and/or mobile device
- if the text and/or image don’t work well at different sizes you may need to upload a new image or change the text
- when satisfied you can Publish the index to both destinations (Production and Staging)
Posted in Department Guides, syndicated-posts, Training
The Footer Graphic is the large image on the bottom of the homepage. It sits under the footer and is only visible on the desktop version of the homepage.
For every featured story you will need:
upload the image to cascade
- use the dropdown to navigate to Home – Responsive
- high light the images > footer folder
- for each image
- go to New > File or Image
- Browse to find the image on your computer
- Submit to upload the image
- be sure to rename each image using a good naming convention
- select each image
- go to Move/Rename
- enter the new name in the System Name field
- consider using the date in the name
- for example: 20141204-longlane.jpg
Once the image is uploaded you will need to add your new item to the component.
- use the dropdown to navigate to Home – Responsive
- go to components > footer-img
- press Edit
- you will see the data definition allowing for data input
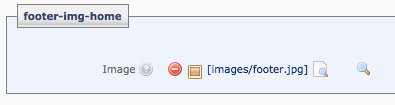
- use the paper with the magnifying glass icon to select the Image
Preview your changes
You should preview the how the image displays – it should only display on the desktop view of the responsive page.
- you can do a preliminary check of changes within cascade
- in Cascade go to Home > Responsive
- click on index to see the page in View mode
- resize the cascade window to simulate the desktop, tablet and mobile views
- to allow others to see the image you can publish the homepage and the images to the Staging Server
- go to Home > Responsive
- publish the images
-
- go to images > footer
- go to Publish
- be sure to uncheck the Production destination
- you only want to publish to the Staging destination
- publish the index
- go to Base Folder
- select the index
- go to Publish
- be sure to uncheck the Production destination
- you only want to publish to the Staging destination
- after the images and index have been published to the Staging Server you can view your changes at
http://cascadewww-staging.wesleyan.edu
- you can check this url on a desktop by re-sizing the window to simulate other device sizes
-or-
you can use this url on a tablet and/or mobile device
- if the text and/or image don’t work well at different sizes you may need to upload a new image or change the text
- when satisfied you can Publish the index to both destinations (Production and Staging)
Posted in Department Guides, syndicated-posts, Training
All of the menu items in all of the red dropdown menus are managed in one place.
Locating the file to update
- use the dropdown to navigate to Home – Responsive
- go to components > menus
- main-nav – updates all of the red dropdown menus
- there are a lot of loops/levels in here, so you will need to pay attention to where you are.
Example of Loops
start of menu loop
start of About loop – add the text and link for About
start of drop down
start of column 1 – add name for About’s column 1
start of items – add all of the navigation text and links for About’s first column
end of items
end of column 1
start of column 2 – add name for About’s column 2
start of items – add all of the navigation text and links for About’s second column
end of items
end of column 2
start of column 3 – add name for About’s column 3
start of items – add all of the navigation text and links for About’s third column
end of items
end of column 3
end of drop down
end of About loop
start of Admission & Financial Aid loop
start of drop down
start of column 1 – add name for Admiss & Finaid’s column 1
start of items – add all of the navigation text and links for Admiss & Finaid column 1
end of items
end of column 1
start of column 2 – add name for Admiss & Finaid’s column 2
start of items – add all of the navigation text and links for Admiss & Finaid column 2
end of items
end of column 2
start of column 3 – add name for Admiss & Finaid’s column 3
start of items – add all of the navigation text and links for Admiss & Finaid column 3
end of items
end of column 3
end of drop down
end of Admission & Financial Aid loop
…..
….
…
end of menu loop
Updating the Menus
- use the dropdown to navigate to Home – Responsive
- go to components > menus folder
- go to the block main-nav
- press Edit
- you will see a data definition allowing for data input

- Each of the red dropdown menus is assigned a number
- Left Menu >> Menu Item 1 is the About menu
- Left Menu >> Menu Item 2 is the Admission & Financial Aid menu
- Left Menu >> Menu Item 3 is the Academics menu
- Left Menu >> Menu Item 4 is the Campus & Community menu
- For each of the menus you can set:
- Link Text – the text for the main navigation
- Internal/External Link – link for main navigation
- Each of the Main Menu Items has a loop for it’s content
- Left Menu >> Menu Item (1,2,3, or 4)>> Drop Down
- The content has 3 loops – one fore each column
- Left Menu >> Menu Item (1,2,3, or 4) >> Drop Down >> Column (1,2, or 3)
- Each of the columns in a section should have a name
- Left Menu >> Menu Item (1,2,3, or 4) >> Drop Down >> Column (1,2, or 3) >> list
- Section Name — this is the title for column 1 in this section
- Each column contains a loop that holds all of the items/navigation in that column
- Left Menu >> Menu Item (1,2,3, or 4) >> Drop Down >> Column (1,2, or 3) >> list >> List Item
- list Items
- Link Text – clickable text in the menu
- enter either an Internal or External Link
- use the paper with the magnifying glass icon to select an Internal Link
– or –
- type in an External Link
- be sure to include http://
- Events will show in order they are entered but they can be re-ordered
- Tools for adding, deleting, reordering
- : to add another entry
- : to remove an entry
- : to reorder
Preview your changes
You should preview how the text fits in the red dropdown box on all sizes of the responsive page.
- you can do a preliminary check of changes within cascade
- in Cascade go to Home > Responsive
- click on index to see the page in View mode
- resize the cascade window to simulate the desktop, tablet and mobile views
- to allow others to see the image you can publish the homepage and the images to the Staging Server
- go to Home > Responsive
- publish the index
- go to Base Folder
- select the index
- go to Publish
- be sure to uncheck the Production destination
- you only want to publish to the Staging destination
- after the images and index have been published to the Staging Server you can view your changes at
http://cascadewww-staging.wesleyan.edu
- you can check this url on a desktop by re-sizing the window to simulate other device sizes
-or-
you can use this url on a tablet and/or mobile device
- if the text and/or image don’t work well at different sizes you may need to upload a new image or change the text
- when satisfied you can Publish the index to both destinations (Production and Staging)
Posted in Department Guides, syndicated-posts, Training
A site-wide alert can be displayed on the top of all pages that have the “black bar”. The alert box is yellow and contains text and a link to more information.
Adding a site-wide alert message.
- use the dropdown to navigate to Home – Responsive
- go to components > site-wide-alert
- press Edit
- you will see the data definition allowing for data input
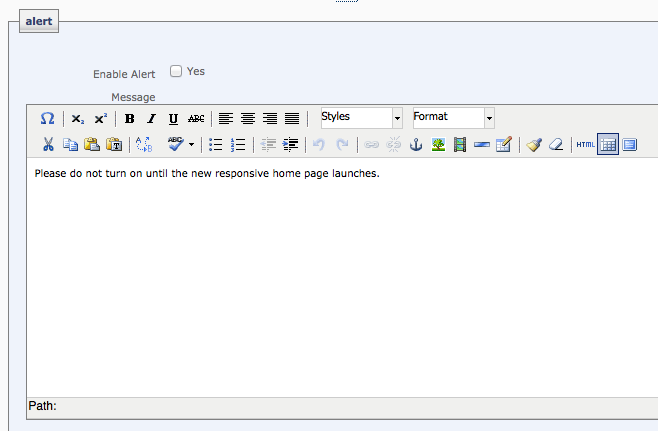
- enter the Message
- you have access to the GUI for formatting
- it would be best to limit yourself to bold, italics and links
- when you are ready to put the message into production check the Enable Alert Yes box
Preview your changes
You should preview how the alert box displays on the top of all pages in all sizes of the responsive page.
- you can do a preliminary check of changes within cascade
- in Cascade go to Home > Responsive
- click on index to see the page in View mode
- resize the cascade window to simulate the desktop, tablet and mobile views
- to allow others to see the image you can publish the homepage and the images to the Staging Server
- go to Home > Responsive
- publish the index
- go to Base Folder
- select the index
- go to Publish
- be sure to uncheck the Production destination
- you only want to publish to the Staging destination
- after the images and index have been published to the Staging Server you can view your changes at
http://cascadewww-staging.wesleyan.edu
- you can check this url on a desktop by re-sizing the window to simulate other device sizes
-or-
you can use this url on a tablet and/or mobile device
- if the text and/or image don’t work well at different sizes you may need to upload a new image or change the text
- when satisfied you can Publish the index to both destinations (Production and Staging)
Posted in Department Guides, syndicated-posts, Training
Jan. 7, 2015 by Karen Warren
ITS will be performing maintenance on the network on Saturday morning, Jan 10, between 7:30 and 11:00 AM. There will be no period when the entire network will be offline, however there will be rolling intervals of down times between 15 and 30 minutes across the campus within this window. The maintenance affects campus connections only. Users will be able to connect to systems from off campus without interruption.
Posted in maintenance, syndicated-posts