Aug. 13, 2014 by Karen Warren
ITS worked late into the night to resolve a network problem that caused very slow performance and affected many services including email. No services were completely offline, but response times were slow and often timed out. The issue was resolved at 3:00 AM.
Posted in syndicated-posts
Aug. 12, 2014 by Karen Warren
ITS is investigating the cause of a network slowdown that started around 4:30 PM and is causing erratic performance on segments of the network.
Posted in syndicated-posts, Urgent
Jul. 29, 2014 by Karen Warren
ITS will be upgrading the Moodle system on Tuesday morning, August 5 during the scheduled system maintenance window. You will notice some changes in the interface. Moodle will be online by 7:00 am and available for use.
Posted in maintenance, syndicated-posts
Jul. 28, 2014 by Karen Warren
There was a service interruption in some perimeter buildings on the south side of campus between 5 and 6 pm today. ITS has resolved the problem.
Posted in syndicated-posts, Urgent
On Saturday, July 12 from 7am-7pm, ITS will be completing an upgrade on WesFiles. Access to any files on WesFiles will be unavailable during this time. Please plan accordingly.
Karen Warren
Director of User and Technical Services
Posted in maintenance, syndicated-posts
Jun. 21, 2014 by Karen Warren
ITS completed its maintenance early and all systems are online and functioning as of 10:00 am this morning.
Posted in syndicated-posts, Urgent
Jun. 19, 2014 by smachuga
Systems affected – All ITS systems including file storage, PeopleSoft Systems, Moodle, Millennium and email. (Internet access will continue to work from campus).
ITS will be performing hardware maintenance on Saturday, June 21 from 7 am to Noon. This maintenance arose after unexpected power outages that affected the data center on Memorial Day. Because email will be unavailable, any updates or information that needs to be shared during this maintenance window will occur on our Facebook and Twitter feeds.
Posted in maintenance, syndicated-posts
Here is documentation on how to crop or resize images in Photoshop Elements (this is different from just Photoshop).
Crop Images in Elements
- To crop an image in Photoshop Elements, first open the program and open the image file you wish to crop.
- You should find a vertical toolbar on the left hand side of the program window. Select the crop tool.

- Settings should appear on the bottom of your window. You can adjust these settings for whatever dimensions you want your photo to be.

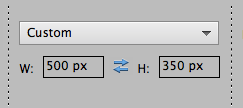
- In the “W:” and “H:” fields, you can specify the width and the height of the image you want to crop it to. While by default the dimensions are in inches, you can also type in other measures, including pixels, as the example shows below. (In the dropdown, you also have an option to select No Restriction that will allow you to crop free-hand.)
- Then, hover your mouse over the image, select the top-left corner from which your cropped image will begin, and expand the crop window to where you wish your image will be cropped to.
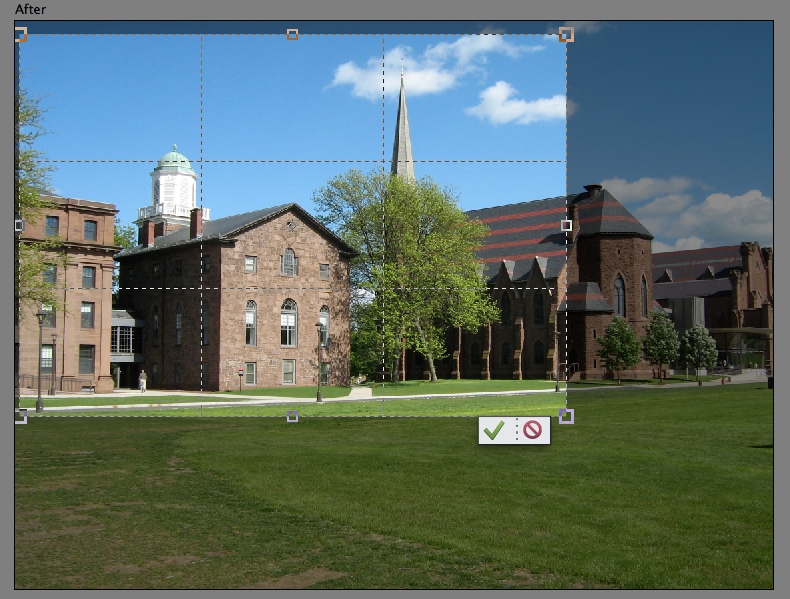
- Hit the green checkmark to apply your crop settings. Be sure to save your image when you finish.
Resize Images in Elements
- To resize an image, first open the Photoshop Elements program and open the image file you want to resize.
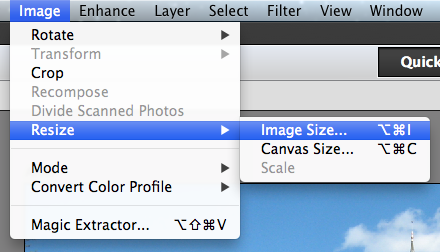
- In your top menu bar, select “Image” > “Resize” > “Image Size”.
- A window will appear. Here, you can decide what you want the size of the image to be under “Document Size”. Note that the proportions of your image will remain the same, thus when you change the Width, the Height will adjust appropriately. Hit OK when you’ve made your changes.
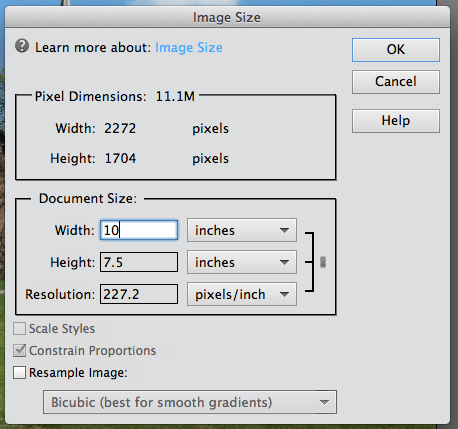
- Your image should be resized. Be sure to save your image when you finish to ensure the changes are applied.
Posted in syndicated-posts, Training
The following is some documentation on how you can create a new exhibition in the CFA website.
- First, log into Cascade and navigate to your website.
- Once you arrive at the CFA dashboard, navigate to the galleries folder on the left hand navigation tree, then the pages folder.
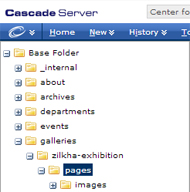
- Once you navigate to pages, you are ready to move forward.
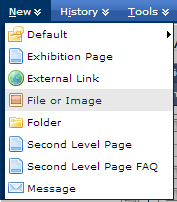
- You want to first upload images for your new exhibition page into the images folder, which you can see sits within the pages folder (refer to the image above). To upload an image, go to the blue navigation toolbar at the top of the page, select “New”, then select “File or Image”.
Make sure you upload two images–one image is a larger image to display on the exhibition page itself, the other is a small thumbnail that will appear on your home page.
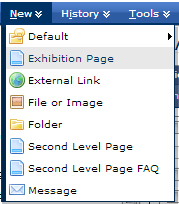
- You are now ready to create the exhibition page itself. First, make sure that the “pages” folder, not images, is selected in the left hand list of navigation. Then, in the blue nav toolbar up top, select “New”, then select “Exhibition Page”.
- In the page that appears after you select “Exhibition Page”, give your page a “System Name”. This is what appears as the page’s url (i.e., www.wesleyan.edu/cfa/galleries/zilkha-exhibition/pages/pagename). The text should all be lowercase and have no underscores or spaces.

- Then, in the “Inline Metadata” section, in the dropdown, select if your exhibition is “Past”, “Current”, or “Future”.

- In the “exhibitions” section, you can now give your exhibition a title, start and end date and time, dates that the exhibition will be closed, as well as a Short Description that will appear on the home page, and a Long Description that will appear on the new exhibition page itself. Each field with a yellow asterisk is required for this page to be completed.

- After you fill that information out, you will now need to add images to this page. Recall we previously uploaded images to Cascade in the images folder, now we need to connect it to this page. In the Thumbnail field, search for the Thumbnail you uploaded into the exhibitions>pages>images folder. Do the same for the larger image in the “Image” field, and give that larger image a caption.

- In the next two larger text fields, you can add in “Related Events” information and “Sponsor/Other Information”.
- When you finish all of the above, ensure that you go into the Metadata tab and input Display Name for this page and a Title.

- You’re now ready to go to the bottom of the page and hit “Submit”!
Posted in Department Guides, syndicated-posts