Feed on
Posts
Comments

You can embed your Brightcove video player into WordPress. Here is some documentation on how to do so.

  • You will need the code associated with your video
    • you can get the code from the person who created your video
  • Log in to your wordpress blog
  • In your WordPress Dashboard, select “Posts” in the left hand navigation, then “Add New”.
    addnew
  • On the top of the content editor itself, select “Text”.
    text
  • Before you paste in your code, you need to first select the button called “code” on the toolbar in the editor. In your Text edit area, “<code>” should appear. Hit “code” twice, so you should see:
    <code></code>
  • In between <code> and </code>, you can paste in your JavaScript player publishing code.
    bcove
  • Remove the excess code (comments and blank lines) to ensure no excess code or blank space pollutes your page.
    bcove1
  • Save or publish your post, and you’re done!

ITS is working on a problem affecting all wired ResNet connections and Guest Wireless access.  We are hoping to have it addressed by 7:00 pm.

For those who have been receiving the reminders but have not yet changed their password, we have extended the deadline to tomorrow, Wednesday, November 13 at 2:00 pm.  A third reminder email will arrive this afternoon.  This will be the final reminder.

From approximately noon to 4:00 on Sat, iDevices were unable to connect to Exchange to retrieve email. ITS was able to address the issue and connections have resumed.

CryptoLocker Trojan Virus

You may hear in the news about the proliferation of this malware on Windows PCs. ITS is actively working on a sitewide solution for Wesleyan domain machines. Also, our antivirus software ESET, is well aware of it. However, because there are so many variants, protection can never be 100% assured. Please be vigilant about not opening attachments you don’t recognize or aren’t expecting–even from email addresses of people you know.  Be sure to protect your personal Windows PCs by keeping them updated with antivirus software.

Here are a couple of informative links about this issue:

A video that provides a good overview in accessible language:
http://finance.yahoo.com/video/hacking-america-cryptolocker-virus-181300909.html

An article from our AntiVirus vendor, ESET:
http://kb.eset.com/esetkb/index?page=content&id=SOLN3433&actp=search&viewlocale=en_US&searchid=1383849506167

In order to create a new section with pages underneath it on your website, you will have to use folders. Within a folder, you need to have at least two pages, one of which is named “index” to display properly. See below how to ensure that they appear in your navigation correctly.

  • In your site’s dashboard in Cascade, first create a new folder. Select in your left hand navigation list where you want this new folder to reside. Typically, new folders and new sections should live under “Base Folder”. If this is the case, select Base Folder. 
  • Next, in the blue navigation bar at the top of the page, select “New” and then “Folder”.
    folder
  • You’ll then arrive at a page to create a “New Folder”. In the filed called “System Name,” give this folder a system name. Remember, a system name should be all lowercase characters, and not have any spaces or symbols in them. For example, a system name may be: “systemname“, but not “System Name”.
    folderpage
  • After you’ve given your folder a system name, select “Metadata”.
  • In this window, you need to give your folder a “Display Name”. A display name is crucial for your folder for it to appear in your site’s navigation properly. A display name can be formatted any way you’d want the folder displayed, such as: “New Folder”.
    meta
  • Once your folder has both a display name and a system name, you can hit Submit at the bottom of the page.
  • Now that your folder is created, you need to create pages to live within that folder.
  • Like how you created this new folder, first select this very folder in the left-hand navigation.
  • Once you do so, go to the top of the page at the blue navigation toolbar again to select “New”, but this time, a “Second Level Page”.
  • This page that you create must have a System Name of “index”.
  • Ensure that this page has also a Display Name and a Title so the page appears properly in your navigation.
  • Once this “index” page is created in this new folder, go ahead and create another new page, this time giving it a system name of whatever you’re creating these pages for.
  • Now that you have a folder that is properly named and two pages within that folder, one of which is “index”, you’re ready to go!

Pages with collapsible links and content can be used to display FAQs, staff listings, and other types of content in Cascade.


A page with collapsible content contains two primary elements:

  • the collapsible link: the text you click to reveal the desired content, called
  • the collapsible content: the content that is revealed by clicking on the collapsible link.


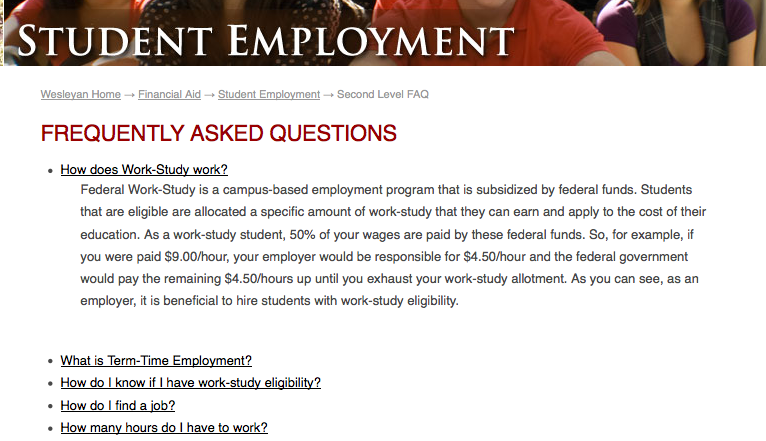
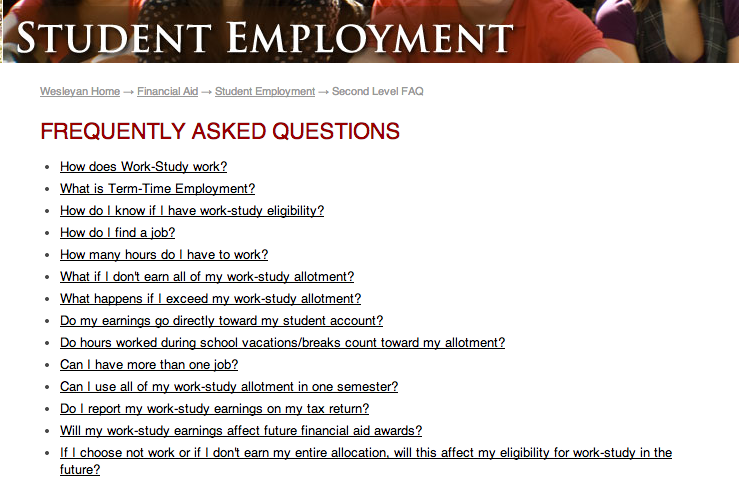
Below is an example from the Financial Aid website:

1


There are two types of pages with collapsible content in Cascade:

  • FAQ pages—allows for a single set of collapsible links and content
  • Collapsible List pages—allows for multiple sets of collapsible links and content


Understanding the Different Formats

Before creating a new page in Cascade, it’s helpful to understand the two different formats for displaying collapsible content.


An FAQ page is suitable if you have a single group of text-only items (links, questions, phrases, etc.) you want to display with collapsible content.

2

A Collapsible List page is suitable if you have multiple groups of items you want to display with collapsible content. This may include a list of categorized questions, staff listings, etc. An important difference between an FAQ page and a Collapsible List page is that the latter allows you to add descriptions before each collapsible link. Keep this in mind if you have images or other content you want to display above the collapsible links.

3


FAQ Pages in Cascade

An FAQ page has two general parts: an introductory section, and a list of collapsible items. Returning to the example on the Financial Aid website, the introductory section is a simple header that is followed by a list of collapsible questions.

4

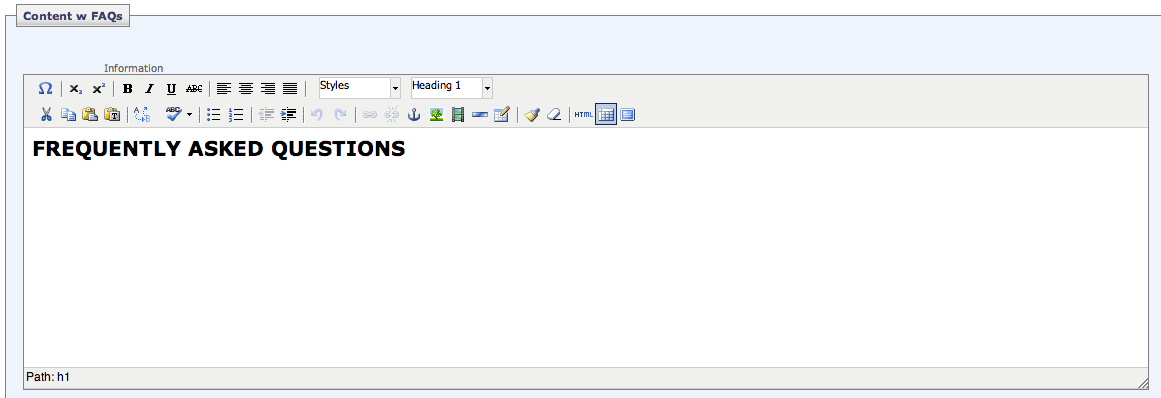
In Cascade, the introductory section is identical to the content section of a second level page, as shown below. Note that although in this case the introduction is a simple header, you can also add introductory text, images, videos, or other content.

5


Formatting an FAQ Page

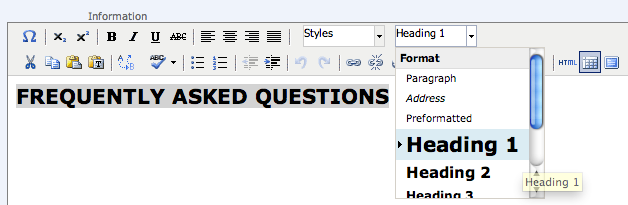
When formatting the introductory section of an FAQ page, it is general practice to include a header. To do this, highlight the header text and choose “Heading 1” from the dropdown at the top of the section.

6


Below the header you can choose to add introductory text, images, or other content. Once the introductory section is formatted, you can add the collapsible content.


The collapsible content in an FAQ page has two parts to it:

  • the “Question” – the text that will become the collapsible link, and
  • the “Answer” – the content that is displayed upon clicking on the collapsible link.

Note that although these fields are titled “Question” and “Answer” you can use them to display any type of collapsible content, such as staff listings.

7

You can add additional Question/Answer fields by clicking on the plus symbol () in the upper right hand corner of the item box. To remove a Question/Answer item, click on the minus symbol (). You can also reorder the items by clicking on the up or down arrows ( ).

Collapsible List Pages in Cascade

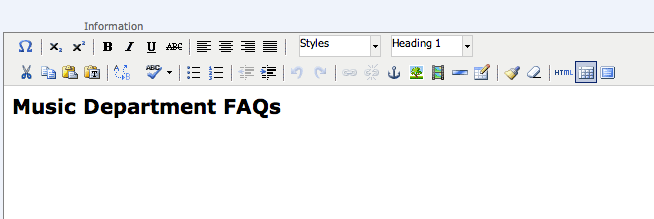
A collapsible list page has three general parts: an introductory section, collapsible items, and groups that organize the collapsible items. Below is an example from the Music website.

8

In this example, “Music Department FAQs” is the header in the introductory section. “Applying to Wesleyan” and “Music Major & Courses” are groups with unique collapsible content listed below.

Note that the introductory section of collapsible list pages is identical to that of FAQ pages.

9


Formatting a Collapsible List Page : Groups

Formatting a collapsible list page is similar to formatting an FAQ page, with some important differences. After formatting the introductory section, you can create and edit groups. On the Music FAQ page, there are four groups, the two shown above are “Applying to Wesleyan”:

11a

And “Music Major & Courses”:

10

Enter the name of the group in the field titled “List Item Group Name,” this will become a header for the items listed under the group.

To add a group, click on the plus symbol () in the upper right hand corner of the item box. You can remove a group (and the items listed under it!) by clicking on the minus symbol (). You can also reorder the groups by clicking on the up or down arrows ( ).

Under each group, you can add list items, the collapsible content to be displayedList items are similar to the Question/Answer items of FAQs.


Formatting a Collapsible List Page : List Items

Each group will have its own set of list items with collapsible content. Below is the first list item under the “Applying to Wesleyan” group of the Music FAQ.

12a

Note that there are “Collapsible Link” and “Collapsible Content” fields that operate exactly as the “Question” and “Answer” fields of an FAQ page. The text entered into the “Collapsible Link” field becomes the link that when clicked reveals the content in the “Collapsible Content” field.

There is one significant difference between List Items and FAQ items. Note that there is a “Description” section above the “Collapsible Link” field. You may add a description before each collapsible link. This description could include introductory text, images, etc. and will appear above the collapsible link. You may also choose not to include a description as exampled in the Music FAQ page.

Organizing List Items

You can add additional collapsible list items by clicking on the plus symbol () in the upper right hand corner of the item box. To remove a list item, click on the minus symbol (). You can also reorder the items by clicking on the up or down arrows ( ).

Note that each group you create will have its own set of collapsible list items under it.


Other Uses for Collapsible Pages

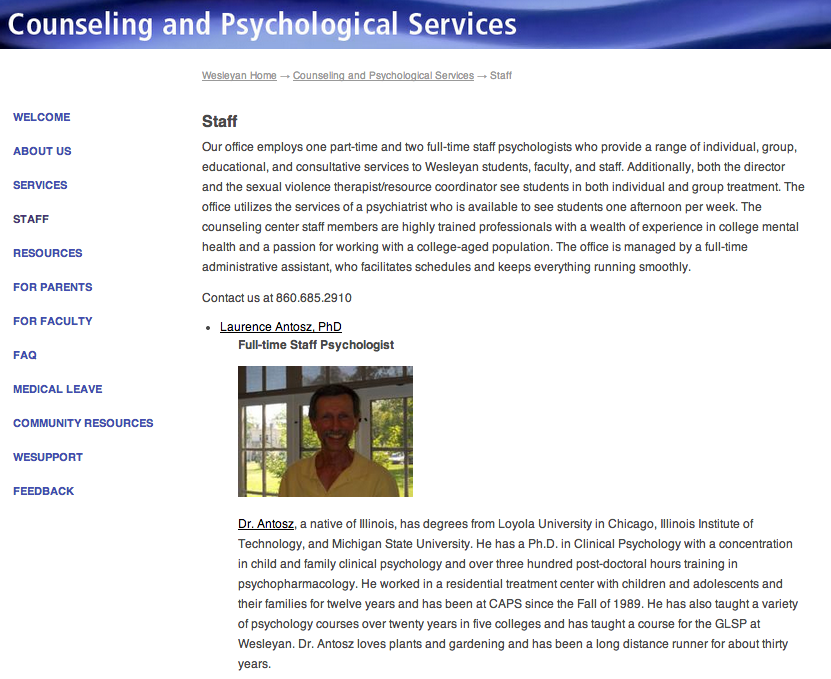
FAQ pages and Collapsible List pages may be used to display content other than FAQs. For example, the CAPS website uses a collapsible list page to display a staff listing.

12

Collapsible content pages are useful and easy to create once you understand how the parts of the page come together.

An email is circulating today that warns of suspension of your email account.  This is particularly unfortunate as we are in the midst of our annual password reset.  However this email (and others like it) are not legitimate.  The fake email is at the bottom of this post.

We do have a real deadline for password reset of November 12.  Note that the emails warning you of this deadline contain informational links, but do not contain links to change your password.  The legitimate email signed by Karen Warren only provides instructions for changing your password.  Please do not be mislead by fake emails posing to be from Wesleyan that are not signed and contain suspicious links asking you for your credentials.

Body of FAKE EMAIL circulating.

*Suspension of Your Email

Access to this server is available from your location through the Universal Resource Locator Click or Copy the below link to a browser and fill the required information: [link removed].

Cascade has a table tool that allows you to create and edit a table. To create a table in Cascade, first click on the “Insert/Edit Table” button tableicon from the toolbar.

Use the resulting window to specify the table properties.

table2

  • Columns:       The number of columns in the table.
  • Rows:                         The number of rows in the table.
  • Cell Padding: The space between the cell wall and the contents of the cell, in pixels.
  • Cell Spacing:            The space between cells, in pixels.
  • Alignment:    The horizontal alignment of the table.
  • Border:          The boldness of the outer border of the table, in pixels.
  • Width:           The width of the table, in pixels.
  • Height:          The height of the table, in pixels.

Click table3  to create the table. The properties of the table listed above can be edited at any time.

An Example Table

A table with the properties specified on the previous page will appear in Cascade as shown below.

table4

Once a table is created, its properties can still be edited at any time. Simply click on the table, and then click on the “Insert/Edit Table” button again.

Editing a Table

You can also edit a table by right clicking on it. You will see the following menu of available options:

table5

You can add or delete rows in the table by rolling over “Row” with your cursor.

table6

Similarly, you can add or delete columns in the table by rolling over “Column.”

table7

Adding Content to a Table

You can add content to your table in the same way you would usually add content to a page in Cascade.

To add an image to a table, you can click on the “Insert/Edit Image” button imageicon, or you can cut and paste an image directly into a cell.

To add text to a table, simply click within a cell and type. Below is a table with some example content.

table8


brightcove.createExperiences();


« Newer Posts - Older Posts »

Log in